Thursday, March 24, 2011

It's summer!...well...almost!

It's the first week of spring, but I think we're all thinking the same thing: it's almost summer!! I have been LOVING the glimpse of sun and warm weather lately and my food has been feeling the change too. As we've been eating up the last of the split pea soup and winter squash, more raw fruit and veggie dishes have been showing up! I've especially enjoyed using up the last of my cilantro from making ceviche a few weeks ago in this fast, easy Cilantro Lime White Bean Dip from  Jessica of How Sweet It Is. Paired with pita bread, tortilla chips, or loads of raw veggies this is a great way to start getting some lighter snacks in after a loooong winter.


Ingredients:
§  1 (15 oz) can white beans*, rinsed
§  1-2 cloves garlic
§  ¼ c chopped cilantro (leaves AND stem can be used)
§  1 tsp lime zest
§  1 Tbsp freshly squeezed lime juice
§  Salt, to taste
§  Freshly ground black pepper, to taste
§  (optional) 1-2 Tbsp olive oil
* Cannellini or butter beans are fine. I also tried pinto beans, which lended a darker, creamier dip. Just try and use light-colored beans so the green of the lime and cilantro can shine through.

Preparation:
1.       Place the beans, garlic, cilantro, and the lime zest and juice in a food processor and process until nice and smooth, scraping down the sides as needed.
2.      Taste the dip and then season with salt and pepper and more lime juice or cilantro if needed. Process again. If the dip is too thick, add a tbsp or 2 of olive oil until you achieve your desired consistency.
3.      Garnish with some minced cilantro leaves, a drizzle of olive oil, and serve with pita chips, tortilla chips, or raw veggies.


Last weekend was especially gorgeous here so we were pretty excited to bring the grill out of hibernation. My mom got the potatoes going, my dad took his place making the burgers, and I went a little nuts with the fruits and veggies (what can I say? I was reeeally excited to have all my summer produce back :p).


While skimming through the Food Network magazine the other day I came across an interesting recipe for GRILLED mango that I just HAD to try out! I mean, don't get me wrong, mangoes don't need ANY help to be completely delicious, but I thought it would be a good way to kick off the grillin' season. The only problem was...well...I've never actually grilled before...yeah. So I thought starting with something that wouldn't kill anyone if I messed it up would be a pretty good idea. For my first time grilling all by myself I thought it turned out okay! I'll need to adjust the heat more next time to give the mango some nicer char marks, but it tasted great! If you're still questioning the whole "grilled fruit" thing, just remember that bell peppers and tomatoes are fruit too and honestly, I think the mango ended up tasting a lot like grilled peppers, but even more amazing! Just make sure to use mango that is really sweet and ripe, but not too soft and you are in business! Happy Spring-It's-Almost-Summertime! :)


Ingredients:
§  3 mangoes
§  Salt, to taste
§  Cayenne pepper, to taste
§  Olive oil
§  1 lime, halved
§  1/2 cup Mexican crema (or 1/3 cup sour cream mixed with 2 tablespoons milk)
§  1 Jalapeno pepper, thinly sliced or chopped
§  Fresh cilantro, chopped

Preparation:
1.       Preheat a grill to medium-high.
2.      Peel the mangoes and slice the flesh off the sides, away from the pit in pieces that are as big and even as possible. Lay the slices flat on a baking sheet, season with salt and cayenne, and drizzle with olive oil. Turn the slices over and repeat. Squeeze one of the lime halves over the top.
3.      Grill the mango slices, turning once, until well-marked. This may take 2 to 3 minutes or up to 10 minutes, depending on the strength of your grill. Use a small slice of mango as a tester and then go from there.
4.      Transfer the grilled slices to serving plate and squeeze the other lime half on top. Spoon the crema over the mango and garnish with jalapenos and cilantro or serve them on the side.


Monday, March 14, 2011

Daring Cooks Challenge 2: ¡Me Encanta PerĂº!

Well here we are again! Daring Chef Challenge #2! (I'm telling you, doing these things really makes the month seem to fly by EVEN faster! It's insane!) This month's challenge "¡Me Encanta PerĂº!" comes from  Kathlyn of Bake Like a Ninja. Having just returned from a stay in Lima, Kathlyn brought us back two highly popular Peruvian dishes: ceviche and papas rellenas. 
Although I'm not a big fan of Anthony Bordain, he was very helpful with this challenge because I had JUST watched an episode of him eating ceviche in Peru so I had a pretty good idea about it before I read what Kathlyn had to say. Basically, ceviche (seh-BEE-chay) is fish that is "cooked" in a citrus juice mixture. What the type of fish, citrus juice, and accompaniments vary depending on what culture the dish comes from. Here are some different options:
Fish: tuna, mahi-mahi, shrimp, scallops, other white fish
Juice: lime, sour orange, grapefruit, lemon
Accompaniments: sweet potatoes, corn, tomatoes, avocado, bell peppers, tacos, tortilla chips

The papas rellenas I was not as familiar with, but after 2 years of Spanish I could figure out a few things :p papas = potatoes, rellenas = stuffed...yep there you have it, stuffed potatoes! But don't go thinking baked-potatoes-with-sour-cream-and-bacon stuffed potatoes! No sir, we're talking boiled, mashed, deep fried potatoes around a sweet, spicy beef filling!

I knew right off the bat both of these would definitely be challenges for me...dealing with the "raw" fish, making the meat filling for the potatoes, AND deep frying once again...yeah not really a breeze, but I finally got up the nerve and just DID it! So here's the recipes I used (the ones Kathlyn provided), the pics I managed to take, and my notes about the whole thing, enjoy!

Peruvian Scallop Ceviche

I chose to use scallops instead of white fish for this recipe 1. because they didn't have any white fish that was very high quality at the store 2. the scallops at the store looked really good 3. I'd never tried scallops 4. the scallops wouldn't need much preparation 5. the scallops were from Peru! I decided to use limes AND lemons just for a more interesting flavor. And while I do think ceviche with tomatoes and avocado sounds great, I decided to stay true to the Peruvian presentation with sweet potatoes and corn.

Ingredients:
§  2 lbs. firm white fish (I used Peruvian bay scallops)
§  Salt and pepper
§  2 garlic cloves, mashed
§  1 chili pepper, seeded and minced (Aji if you can find it, but Jalapeno or other peppers can sub)
§  1 tablespoon finely chopped fresh cilantro
§  1-1 1/2 cups freshly squeezed lime juice or lemon and lime juice (I used 3 large lemons and 7 limes) 
§  1 red onion, thinly sliced into rounds
For garnish:
§  2-3 large sweet potatoes
§  2-3 large ears of corn
§  Lettuce leaves

PREPARATION:
1.       Wash and trim your fish as needed and cut into ½-2 inch pieces depending on taste (I cut my scallops in half, about ½ inch pieces, so they would cook faster) and place in a glass or other non-reactive pan large enough so that all the pieces are in a single layer. Season with salt and pepper.
2.      Combine the garlic, chili pepper, cilantro, and citrus juices and pour over the fish. If the fish is not completely cover, add more juice. Place the onion slices on top of the fish and cover the dish with a lid or plastic wrap.
3.      Refrigerate the fish to let it “cook” in the acid of the citrus juice. This can be a period of 10 min if you like your fish very rare or up to 12 hours if you like your fish well done (I cooked mine for 4 hours).
4.      While the ceviche cooks, boil your sweet potatoes and corn until tender and then let them cool.
5.      When your ceviche is cooked to your liking, remove the onions and discard. Drain most of the juices. Peel and slice the sweet potatoes ¼-½ inch thick and cut the kernels off of the corn.
6.      To serve: Place a small scoop of ceviche in a bowl or cup, garnish with sweet potato slices, corn, and extra cilantro leaves. Eat as is or with tortilla chips. This should be an appetizer-sized plate, but you can increase the amounts to make it meal-sized.


One whole scallop. You can vary the size of your
cuts to work with the length of your cooking time.
I wanted mine to cook faster, so I cut each scallop
in half. If you wanted to slow down the cooking
so that you could let it sit overnight, make your
cuts bigger.

Smaller pieces = faster cooking

Bay scallops from Peru! :)

Mixing the "cooking" ingredients

Season with salt and pepper. I honestly didn't
taste the salt or pepper after my ceviche was
cooked. I pretty much tasted...lime...not sure
if that's a good thing or not...

The cooking liquid should completely cover
your fish or scallops

I think the onions were supposed to impart
some of their flavor into the scallops, but I
didn't taste it...at least they helped keep the
scallops pushed down under the juice

Cook your sweet potatoes to a texture that you
like. I kept my pretty firm, but you could do
them soft as long as they hold together

A nice, refreshing snack or appetizer

Or a light meal, your choice!


Papas Rellenas de Carne
A vegan or vegetarian filling could easily be made for these, but since I make lots of meat-free foods, I felt like that wouldn't be very "daring" of me...so I went with the traditional meat filling with all the little flavor boosters. I encourage you to use ALL of them, yes the raisins, eggs, and olives. The raisins really add a nice sweetness and don't worry if it looks like a lot of chili pepper, most of the spiciness cooks out anyways.
Ingredients:
For the dough:
§  2 ¼ lbs russet potatoes (about 5 large)
§  1 large egg
§  Salt and pepper
For the filling:
§  2 Tbsp olive or canola oil
§  ½ lb ground beef
§  10 black olives, diced
§  3 hardboiled eggs, diced
§  1 small onion, diced (about 1 cup)
§  ½ cup raisins, soaked in boiling water for 10 min, drained, then minced
§  1 chili pepper (ahi if you can find it, or jalapeño), finely diced
§  3 large cloves garlic, minced
§  1 tsp ground cumin
§  ½ tsp sweet paprika
§  ¼ cup white wine or beef stock (I used ½ white wine vinegar and ½ stock)
§  Salt and pepper
For coating and frying:
§  1 large egg, well beaten
§  1 cup all-purpose flour
§  Salt and cayenne
§  2 cups dry or fresh breadcrumbs (I used 2 large slices of toasted bread, ground-up in my food processor)
§  Oil for frying, enough to fill your pan 2 inches high (canola, or vegetable oil work well, DO NOT use olive oil!)

PREPARATION:
1.       In a large pot, boil the potatoes until they can be easily pierced with a fork (15-20 min) then remove from the water and cool.
2.      While the potatoes are boiling, prepare the filling. Heat the oil to med in a large skillet. Add the onion and garlic and cook until soft and slightly browned. Add the chili pepper and sautĂ© a minute more. Add the ground beef and brown, breaking up into small pieces. Add the raisins and the spices and cook for a minute.
3.      Deglaze the pan with the white wine or stock (pour it all over the meat mixture) then add the olives and cook for a few minutes until most of the liquid is absorbed. Remove from the heat and mix in the hardboiled eggs.
4.      Allow the filling to cool while you finish the dough.
5.      Peel the cooled potatoes. To mash them, you can use a potato ricer (recommended), potato masher (works okay), a fork (not recommended), or you can chop them into small chunks and pulse them in a food processor in small batches until they just come together (recommended).
6.      Place the mashed potatoes in a large bowl and season with salt and pepper to taste, then mix in the egg and “knead” with your hands for a minute to get everything mixed really well.
7.      While you form your papas, heat the oil to 350 F in a large frying pan with high sides or in a Dutch oven.
8.     To form the papas: Lightly flour your hands and in your palm, scoop out a handful of potato dough and use your other hand to flatten and spread it all up your palm and fingers in a med-thick layer. Use your free hand to scoop a heap of filling into the center of your dough and then fold your hand over it and press the dough together at all the seams, pressing the filling in as needed (This will make a pretty big serving, about entrĂ©e-sized. Use smaller amount to make snack-sized papas. You can also make the first one small to use a tester in the oil). Continue with the remaining dough and filling until one or both is all gone.
9.      To coat the papas: Get out 3 med-large bowls (preferably with low sides). In the first bowl, place the flour and season it with the salt and cayenne, in the second bowl, place the beaten egg, and in the third bowl, place the bread crumbs. Make one hand your “dry hand” and the other, your “wet hand”. Use your dry hand to pick up a papa and roll it in the flour to coat it (dredging), then place it in the egg bowl and use your wet hand to roll it around and coat it, then use your wet hand to place it in the breadcrumb bowl and use your dry hand again to coat it with bread crumbs. Place the coated papa on a plate or sheet pan until they are all ready for frying. Repeat with the remaining papas.
10.  To cook: Place a single papa in the hot oil and fry it for a minute on one side, until golden brown, then flip and repeat on the other side then place on paper towels to drain. If it cooks too slowly or too quickly, adjust the temperature, then repeat with the other papas. (You can keep cooked papas warm in the oven if you have a lot to do) Serve immediately. (Makes about 6 large, entree-sized papas)

I weighted out 2 1/4 lbs and 5 large russet
potatoes was pretty much perfect!

Do yourself a favor and boil these guys until
they are VERY soft. It will save you a load
of work mashing them up! You should be able
to peel the skins right off with your fingers, but
if that doesn't work, just use a paring knife
and get off as much as you can without losing
a lot of potato

For my bread crumbs, I just toasted a few
slices of whole wheat bread, cooled them, and
then ground them up in my food processor.
Perfect crumbs every time! But you can use
store-bought or whatever you like

Sorry I didn't get many pics of the preparation
for these! Most of it was pretty basic (chopping
the ingredients and browning), but I couldn't
get any deep-fry pictures because by that time
it was so late at night and dark out (and my
hands were very busy and very messy :p)

But here is the finished product at least! I think
my main mistakes were just that I forgot to
season the potato dough so it was rather bland
and I didn't stuff them with enough of the filling.
Other than that, I think these would be great with
 some sour cream or yogurt, but if you don't like
mushy papas rellenas, don't make enough for
left-overs as they lose their fresh crispiness


Salsa Criolla

This "sauce" can be served with either the ceviche or the papas rellenas or BOTH. I served it
with the ceviche and I thought it went great! I highly encourage you to try this even if you
aren't a big onion fan. The onion becomes slightly soft while still adding a nice crunch and it
has this wonderful tangy flavor that doesn't leave you feeling like you just ate a mouthful of
onions! It's not that spicy either, but you could add more chili pepper if you wanted it to be.
If nothing else, it definitely adds some great color to a plate.

Ingredients:
§  2 large red onions, sliced in half length-wise and then sliced AS THINLY AS POSSIBLE (they should be half circles)
§  ½-1 chili pepper (depending on how much heat you want) seeded and minced
§  1 Tbsp vinegar (I used white)
§  Juice from 1 lime
§  Salt and pepper, to taste

PREPARATION:
1.       Soak the onion slices in cold salt water for about 10 minutes to remove bitterness. Drain completely.
2.      In a medium bowl, combine the onions with the rest of the ingredients, season with salt and pepper and then mix around to make sure everything is coated.
3.      Cover the bowl with a lid or plastic wrap and refrigerate for 30min – 1hr so that the onions can soften and the flavors can combine.

Again, this is pretty basic, just slice the onions
really thin, soak them, and then mix them
together with everything else and you're done!

One they've had a chance to
macerate in the acid, the onions
should be soft enough to bend and
be shaped into circular heaps and
such, but still stiff enough to have
a nice crispy crunch to them

By taste and appearance I think this condiment
is a definite winner with the ceviche!

Even if you don't like fish, onions, or potatoes much, I really encourage you to try these dishes out! It's not enough to be a daring cook, you also have to be a daring eater!


Saturday, March 12, 2011

The Hidden Treasures of the Produce Clearance Shelf

I have a special place in my heart for the reject food. Those day-old loaves of bread that can't be sold anymore, the excess food that has no home,...and the produce on the clearance shelf at the store. Ah yes, the over-ripe fruits and veggies that are nearing the end of the line...I feel it is my duty to save as many of them as possible. Last week it was the tomatoes, peppers, and scallions in my vegetable pancakes, sometimes it's bags of apples, grapes, potatoes, etc. This week I found a real treasure: 2 big bags full of passion fruit!! Usually these tennis ball-sized fruits are really pricey with little yield so I very rarely buy them although they are SO very delicious!
Now the question after one of these produce rescue missions is always: "what to DO with all this stuff before it goes bad??" Well first I simply selected all the really ripe passion fruits, cut them in half, and put all the innards in a plastic container to have ready to use. Then with a little food blog searching I easily came up with plenty of recipes I was dying to try. However, there was one that stood out from all the rest...and here it is:

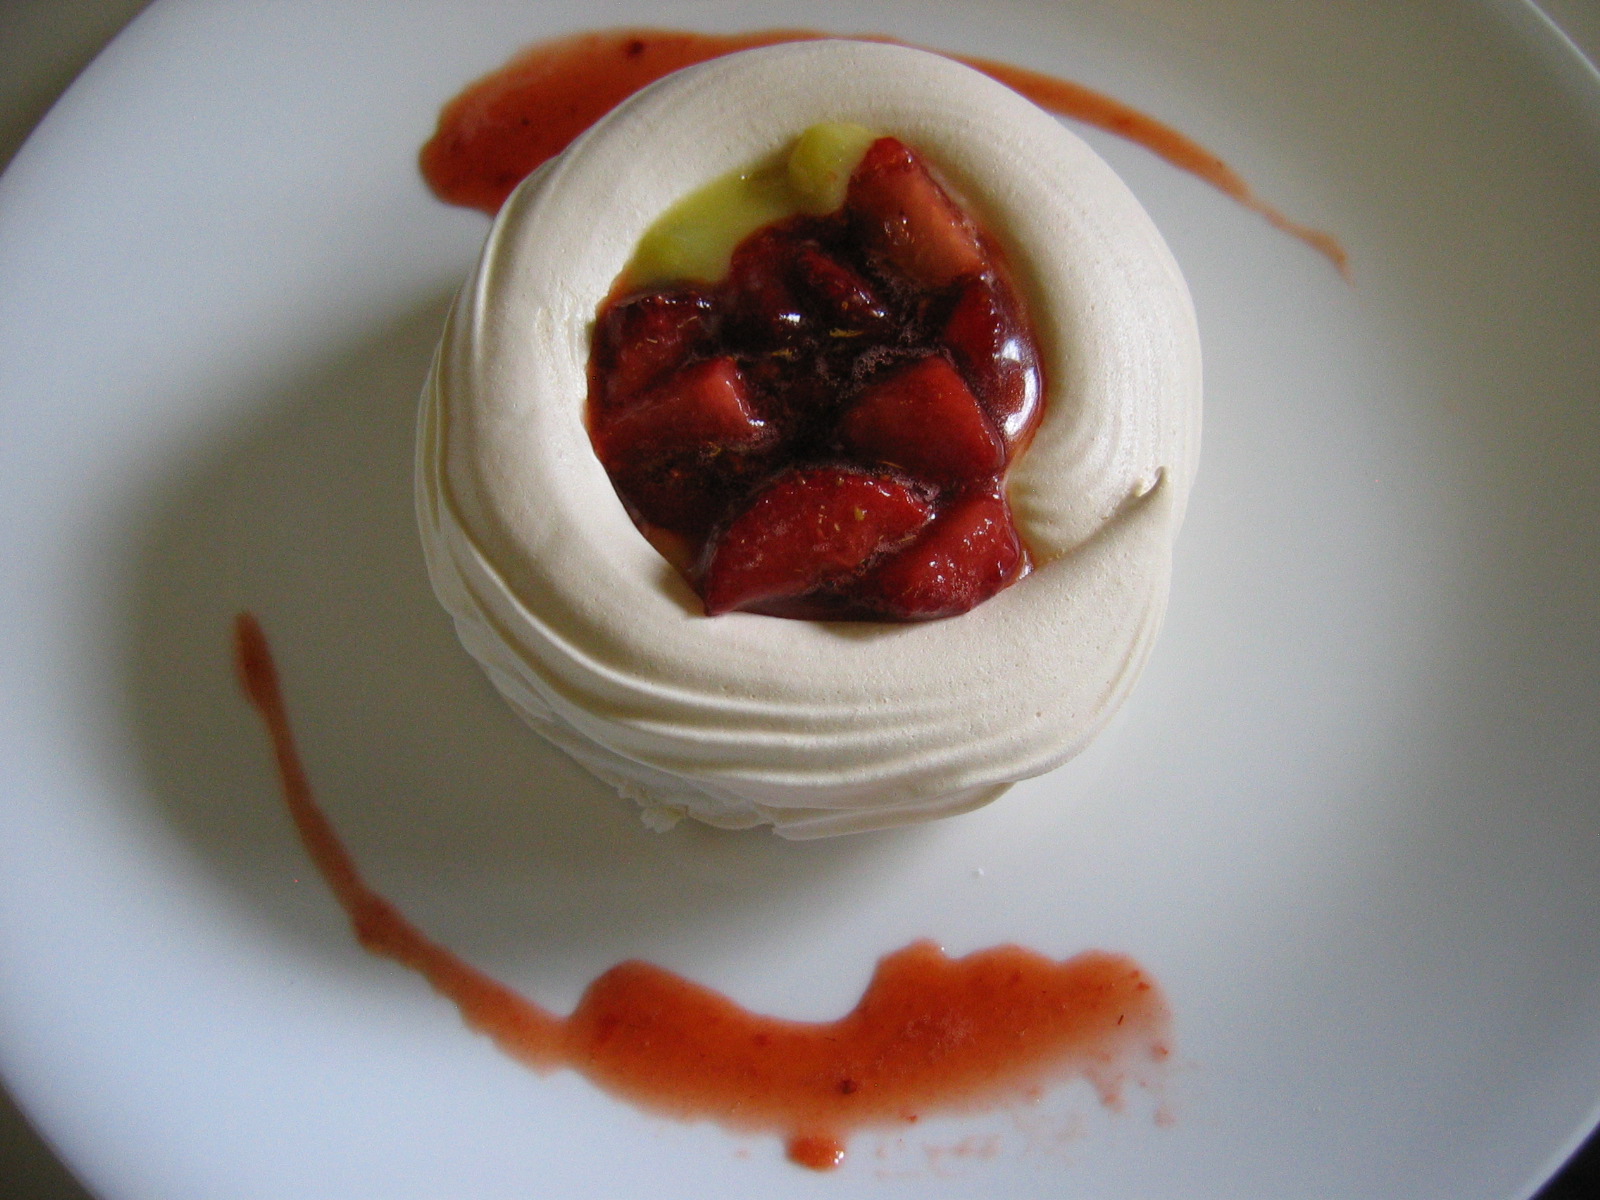
Mini Pavlova Fruit-Filled Nests
(with yogurt cream, passion fruit curd, and balsamic macerated strawberries) 

INGREDIENTS:
For the Pavlova
§  6 egg whites, at room temperature
§  ¼ tsp cream of tartar
§  1 tsp vanilla extract
§  1 1/3 cups caster (very fine) sugar
§  1 Tbsp cornstarch
§  2 Tbsp arrowroot
§  2 tsp white vinegar

For the Passion Fruit Curd
§  ½ c fresh passion fruit juice/seeds/pulp (from 2-3 fruit)
§  1 egg
§  ¼ c granulated sugar
§  2 Tbsp butter

For the Balsamic Macerated Strawberries
§  1 c diced strawberries
§  2 tsp balsamic vinegar
§  2 Tbsp granulated sugar (or less if the berries are very ripe and sweet)

For the Yogurt Cream
§  ½ c heavy cream, whipped to stiff peaks
§  ½ c plain yogurt (can be low or full fat)

PREPARATION:
First prepare the pavlova nests.
1.       Line a baking tray with parchment paper and dab the corners with honey to hold them down.
2.      Place the egg whites, cream of tartar, and vanilla in a clean, dry, bowl and beat until stiff peaks form.
3.      Add the sugar, 1 Tbsp at a time, beating until all the sugar is incorporated and dissolved and the mixture looks thick and glossy.
4.      Stir together the cornstarch and the arrowroot and gradually mix that into the egg white mixture, then slowly add the vinegar. Mix for a minute or so very slowly to get everything incorporated or fold with a spatula.
5.      Preheat the oven to 300 F.
6.      Fill a piping bag with some of the egg white mixture (you can use a fancy tip or not) and pipe 2-3 inch circles on the prepared sheets, placed at least 2 inches apart, refill your piping bag as needed. With a swirling motion, fill in the circles so they are solid bottoms then carefully pipe on top of the original circle edge to create a lip. Pipe more layers for higher nests, but any more than 3 layers probably wouldn’t hold together very well. I did 2 layers.
7.      Bake the nests for 30 min, they should by dry to the touch, give to pressure, and be just barely off-white in color. While the nests cool, prepare the fillings.

Next prepare the passion fruit curd.
1.       Place the passion fruit juice/seeds/pulp and the egg in the top of a double boiler or a large, heatproof bowl and whisk until smooth.
2.      Place over a double boiler or a saucepan with 2 inches of boiling water and then whisk in the sugar. Continue whisking until the mixture is thick, almost like mayonnaise, then remove from heat and stir in the butter.
3.      Whisk until the butter is completely melted and incorporated and then spoon the curd into a small bowl, cover with plastic wrap, and chill until ready to use.

Next prepare the balsamic macerated strawberries.
1.       Mix all of the ingredients together well, cover, and chill until ready to use (at least 30 min).

Next prepare the yogurt cream.
1.       Fold together the whipped cream and the yogurt and refrigerate until ready to use.

To finish.
1.       Once the nests have cooled completely, refrigerate them until just before service. To fill the nests, place a nest in the middle of the plate, spoon a Tbsp of yogurt cream in the middle, then top with 1-2 Tbsp of passion fruit curd, and then a small spoonful of strawberries (try not to let the juice spill out of the nest). To garnish, spoon a smear or two of the strawberries juices next to the filled next and then spoon some passion fruit seeds over the juice. Serve immediately.


My stash of passion fruit! Oh the possibilities...!

Left: Unripe
Right: Nice and ripe, the wrinkles are GOOD!
And besides, you don't eat the outer shell, it's
just the insides you want!

See? OooOooOooh! Yummy! Tart, yet sweet,
and reminiscent of citrus yet with the lovely
crunch of the seeds

Speaking of the seeds, don't throw these puppies
out! They've got a lot of the flavor, a wonderful
texture, and besides, they make up most of the
insides!

Trying to get better lighting by messing with
my camera settings...looks like a science
experiment gone way wrong! It's...ALIVE!

Making the passion fruit curd...I thought I was
obsessed with lemon curd, but oh man, this stuff
is in a league of its own!! Faster, easier, and,
dare I say...even more delicious

These strawberries are pretty typical except
for a "secret" ingredient...

Balsamic vinegar?? YEP! Mollie Katzen has a
similar recipe that I'd always been too afraid to
try, but now I finally have and MAN it is good!
Really, the vinegar brings out the sweetness
of the berries and just adds this little something
extra that makes you go "woah! mmm!"
It's even better if you love balsamic like I do!
TRY. IT!

(Sorry, no pictures of the yogurt cream, it was pretty straight forward, but
I will say this, I really recommend it! It's plain on it's own, but in combination
with the other fillings it is wonderful! My sisters kept asking for more of it...and
they don't like plain yogurt!)

I drew 2.5" circles on my paper and then flipped
it over to trace with my piped meringue, but
after they baked, it somehow bled through
so I do NOT recommend this. Instead,
because the nests expand so much anyways,
just draw the size circle you want on a piece
of normal paper and then look at that as you
pipe the nests, they won't be perfect, but
trust me, they will be just fine as long as you
aren't TOO sloppy. Of course you can
do other shapes too or bigger circles!

I've tried taping my paper down, folding it over,
and using some of the meringue to get it to
stick to the baking sheet, but I've found so far
that honey just works the best for me. It
sticks well, it's safe, and it comes off really
easily and is no problem cleaning, but if anyone
has better ideas, please share, I'd love to hear 'em!

Here you can see the smooshed honey doing
it's job.

6 egg whites. I used frozen, defrosted and they
worked like a charm! I also am an avid egg
white saver! Whenever I have a recipe calling
just for yolks I freeze the extra whites in
groups of two for later use. It drives my dad
nuts to have all these random little egg white
ice cubes, but it pays off later when I don't have
to waste any yolks to get what I want!

Woah look how big those suckers got!

Add the thickeners and the vinegar and you
get this! (PS: DON'T leave out the vinegar!
I promise it adds no flavor, it's for the chemistry
aspect!)

Your meringue will be heavier and stickier
than an ordinary meringue would be.

It should also be slightly shiny.

Time to pipe the nests! (fancy piping tips
are totally optional!)

My circle edge/ring thingy

Fill in the ring with another swirl

Go back over the top of the original ring
to create the edge of the nest

Oooh look it stays! I had enough meringue
to go around each of mine twice, but you could
do 3 layers and it should still hold up, or just
stick to one layer if you want to make more
nests

I made 20 nests total, 2.5 in in diameter, with
2 layers of rim, but this number can vary
depending on how thickly you pipe out the
meringue and a number of other things.
(also i didn't space mine out quite enough)

Here you can see the baked nests are a nice
off-white, beige color (perfect!), but they did
expand and run into each other just a little bit :(

From the top...

Cracks are normal with pavlovas, so don't worry
too much about them, just be careful when
handling these guys. If you package them up
to take somewhere DO NOT drop them (like
I did...oops) or they will shatter

Fill with some yogurt cream

Then passion fruit curd...oooh yeah

AND balsamic macerated strawberries?!
DElishhhh

Of course the juice swirls are optional, but
hey you've worked this hard, why not go
the whole nine yards and really blow away
all your friends?

And to think those egg whites and passion
fruit could have gone to waste! Being a
produce hero really has its benefits!