Saturday, March 12, 2011

The Hidden Treasures of the Produce Clearance Shelf

I have a special place in my heart for the reject food. Those day-old loaves of bread that can't be sold anymore, the excess food that has no home,...and the produce on the clearance shelf at the store. Ah yes, the over-ripe fruits and veggies that are nearing the end of the line...I feel it is my duty to save as many of them as possible. Last week it was the tomatoes, peppers, and scallions in my vegetable pancakes, sometimes it's bags of apples, grapes, potatoes, etc. This week I found a real treasure: 2 big bags full of passion fruit!! Usually these tennis ball-sized fruits are really pricey with little yield so I very rarely buy them although they are SO very delicious!
Now the question after one of these produce rescue missions is always: "what to DO with all this stuff before it goes bad??" Well first I simply selected all the really ripe passion fruits, cut them in half, and put all the innards in a plastic container to have ready to use. Then with a little food blog searching I easily came up with plenty of recipes I was dying to try. However, there was one that stood out from all the rest...and here it is:

Mini Pavlova Fruit-Filled Nests
(with yogurt cream, passion fruit curd, and balsamic macerated strawberries) 

INGREDIENTS:
For the Pavlova
§  6 egg whites, at room temperature
§  ¼ tsp cream of tartar
§  1 tsp vanilla extract
§  1 1/3 cups caster (very fine) sugar
§  1 Tbsp cornstarch
§  2 Tbsp arrowroot
§  2 tsp white vinegar

For the Passion Fruit Curd
§  ½ c fresh passion fruit juice/seeds/pulp (from 2-3 fruit)
§  1 egg
§  ¼ c granulated sugar
§  2 Tbsp butter

For the Balsamic Macerated Strawberries
§  1 c diced strawberries
§  2 tsp balsamic vinegar
§  2 Tbsp granulated sugar (or less if the berries are very ripe and sweet)

For the Yogurt Cream
§  ½ c heavy cream, whipped to stiff peaks
§  ½ c plain yogurt (can be low or full fat)

PREPARATION:
First prepare the pavlova nests.
1.       Line a baking tray with parchment paper and dab the corners with honey to hold them down.
2.      Place the egg whites, cream of tartar, and vanilla in a clean, dry, bowl and beat until stiff peaks form.
3.      Add the sugar, 1 Tbsp at a time, beating until all the sugar is incorporated and dissolved and the mixture looks thick and glossy.
4.      Stir together the cornstarch and the arrowroot and gradually mix that into the egg white mixture, then slowly add the vinegar. Mix for a minute or so very slowly to get everything incorporated or fold with a spatula.
5.      Preheat the oven to 300 F.
6.      Fill a piping bag with some of the egg white mixture (you can use a fancy tip or not) and pipe 2-3 inch circles on the prepared sheets, placed at least 2 inches apart, refill your piping bag as needed. With a swirling motion, fill in the circles so they are solid bottoms then carefully pipe on top of the original circle edge to create a lip. Pipe more layers for higher nests, but any more than 3 layers probably wouldn’t hold together very well. I did 2 layers.
7.      Bake the nests for 30 min, they should by dry to the touch, give to pressure, and be just barely off-white in color. While the nests cool, prepare the fillings.

Next prepare the passion fruit curd.
1.       Place the passion fruit juice/seeds/pulp and the egg in the top of a double boiler or a large, heatproof bowl and whisk until smooth.
2.      Place over a double boiler or a saucepan with 2 inches of boiling water and then whisk in the sugar. Continue whisking until the mixture is thick, almost like mayonnaise, then remove from heat and stir in the butter.
3.      Whisk until the butter is completely melted and incorporated and then spoon the curd into a small bowl, cover with plastic wrap, and chill until ready to use.

Next prepare the balsamic macerated strawberries.
1.       Mix all of the ingredients together well, cover, and chill until ready to use (at least 30 min).

Next prepare the yogurt cream.
1.       Fold together the whipped cream and the yogurt and refrigerate until ready to use.

To finish.
1.       Once the nests have cooled completely, refrigerate them until just before service. To fill the nests, place a nest in the middle of the plate, spoon a Tbsp of yogurt cream in the middle, then top with 1-2 Tbsp of passion fruit curd, and then a small spoonful of strawberries (try not to let the juice spill out of the nest). To garnish, spoon a smear or two of the strawberries juices next to the filled next and then spoon some passion fruit seeds over the juice. Serve immediately.


My stash of passion fruit! Oh the possibilities...!

Left: Unripe
Right: Nice and ripe, the wrinkles are GOOD!
And besides, you don't eat the outer shell, it's
just the insides you want!

See? OooOooOooh! Yummy! Tart, yet sweet,
and reminiscent of citrus yet with the lovely
crunch of the seeds

Speaking of the seeds, don't throw these puppies
out! They've got a lot of the flavor, a wonderful
texture, and besides, they make up most of the
insides!

Trying to get better lighting by messing with
my camera settings...looks like a science
experiment gone way wrong! It's...ALIVE!

Making the passion fruit curd...I thought I was
obsessed with lemon curd, but oh man, this stuff
is in a league of its own!! Faster, easier, and,
dare I say...even more delicious

These strawberries are pretty typical except
for a "secret" ingredient...

Balsamic vinegar?? YEP! Mollie Katzen has a
similar recipe that I'd always been too afraid to
try, but now I finally have and MAN it is good!
Really, the vinegar brings out the sweetness
of the berries and just adds this little something
extra that makes you go "woah! mmm!"
It's even better if you love balsamic like I do!
TRY. IT!

(Sorry, no pictures of the yogurt cream, it was pretty straight forward, but
I will say this, I really recommend it! It's plain on it's own, but in combination
with the other fillings it is wonderful! My sisters kept asking for more of it...and
they don't like plain yogurt!)

I drew 2.5" circles on my paper and then flipped
it over to trace with my piped meringue, but
after they baked, it somehow bled through
so I do NOT recommend this. Instead,
because the nests expand so much anyways,
just draw the size circle you want on a piece
of normal paper and then look at that as you
pipe the nests, they won't be perfect, but
trust me, they will be just fine as long as you
aren't TOO sloppy. Of course you can
do other shapes too or bigger circles!

I've tried taping my paper down, folding it over,
and using some of the meringue to get it to
stick to the baking sheet, but I've found so far
that honey just works the best for me. It
sticks well, it's safe, and it comes off really
easily and is no problem cleaning, but if anyone
has better ideas, please share, I'd love to hear 'em!

Here you can see the smooshed honey doing
it's job.

6 egg whites. I used frozen, defrosted and they
worked like a charm! I also am an avid egg
white saver! Whenever I have a recipe calling
just for yolks I freeze the extra whites in
groups of two for later use. It drives my dad
nuts to have all these random little egg white
ice cubes, but it pays off later when I don't have
to waste any yolks to get what I want!

Woah look how big those suckers got!

Add the thickeners and the vinegar and you
get this! (PS: DON'T leave out the vinegar!
I promise it adds no flavor, it's for the chemistry
aspect!)

Your meringue will be heavier and stickier
than an ordinary meringue would be.

It should also be slightly shiny.

Time to pipe the nests! (fancy piping tips
are totally optional!)

My circle edge/ring thingy

Fill in the ring with another swirl

Go back over the top of the original ring
to create the edge of the nest

Oooh look it stays! I had enough meringue
to go around each of mine twice, but you could
do 3 layers and it should still hold up, or just
stick to one layer if you want to make more
nests

I made 20 nests total, 2.5 in in diameter, with
2 layers of rim, but this number can vary
depending on how thickly you pipe out the
meringue and a number of other things.
(also i didn't space mine out quite enough)

Here you can see the baked nests are a nice
off-white, beige color (perfect!), but they did
expand and run into each other just a little bit :(

From the top...

Cracks are normal with pavlovas, so don't worry
too much about them, just be careful when
handling these guys. If you package them up
to take somewhere DO NOT drop them (like
I did...oops) or they will shatter

Fill with some yogurt cream

Then passion fruit curd...oooh yeah

AND balsamic macerated strawberries?!
DElishhhh
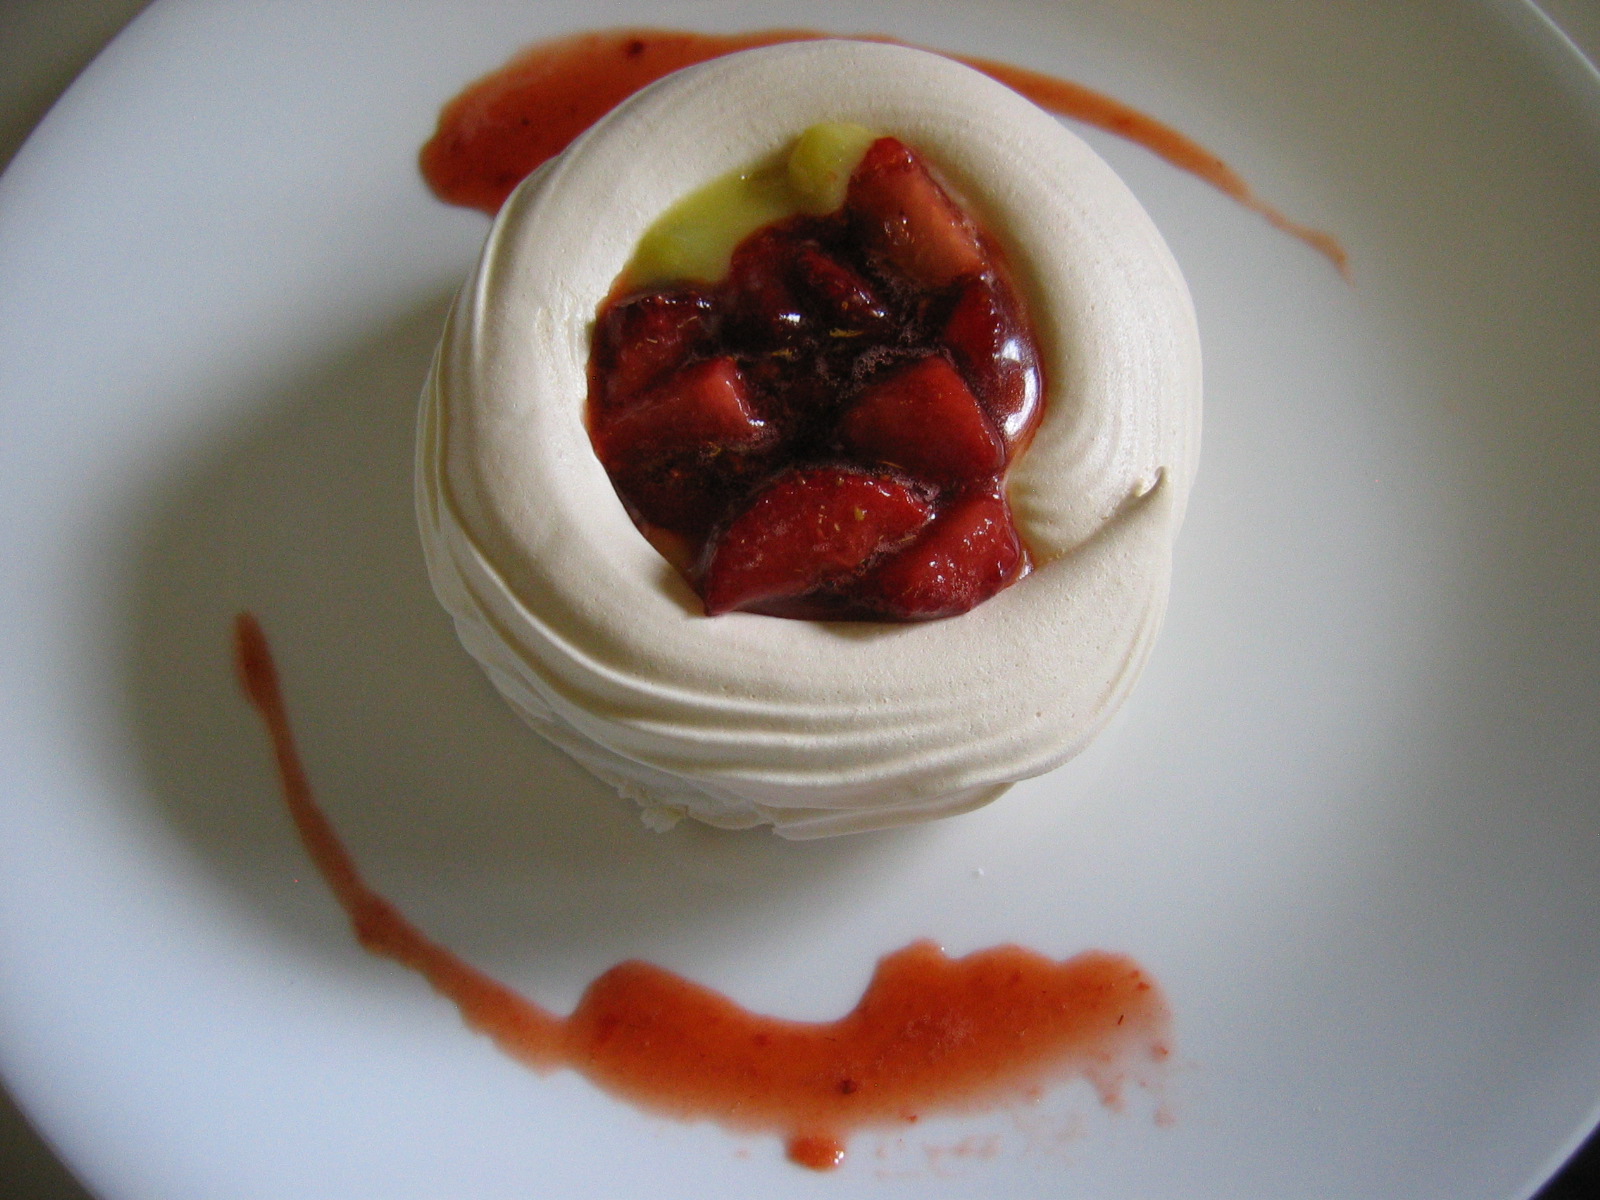
Of course the juice swirls are optional, but
hey you've worked this hard, why not go
the whole nine yards and really blow away
all your friends?

And to think those egg whites and passion
fruit could have gone to waste! Being a
produce hero really has its benefits!

Tuesday, March 1, 2011

Vegetables, ...meet pancakes!

Happy National Pancake Day to everyone!! What a better way to kick off the beginning of March and being another step closer to spring? Besides, everyone loves a good excuse to make pancakes!! The big problem I always have with making pancakes though...is choosing what kind to make! There's whole wheat, pumpkin, banana, apple, gluten-free, blueberry, etc. and then if you want to include crepes and potato pancakes in the mix it gets even harder! The decision usually comes down to what I have on hand. On my particular pancake adventure this week, I had a spaghetti squash, 5 yellow bell peppers, a container of small brown tomatoes (not brown as in spoiled!!), and a half a bunch of scallions. Looks like I'm making veggie pancakes!
I actually have been wanting to try Mollie Katzen's Spaghetti Squash Pancakes recipe for a long time now, even before I knew what spaghetti squash WAS! So...this seemed like the perfect opportunity!
This recipe really was very simple and it would be quick if you don't count prepping the vegetables. Those can easily be done ahead of time if needed and dinner can be whipped up in no time! I used rice flour in mine to see how they would be gluten-free and they turned out great, but all-purpose flour could easily be used as well! The amount of flour you use depends on the consistence you are looking for. Use more flour for thicker, cakier pancakes and less flour for thinner, eggier pancakes.
As for the roasted veggie toppings, I just used what I had and it happened to be amazing, but you could change this up with whatever you have or what is in season at the time. The herbs of course can also be adjusted and changed up however your imagination leads you.
Here's my adapted recipe, mess with it as you please: (sorry if it is a bit confusing, if you read through it twice it will make much more sense!)

Spaghetti Squash Pancakes with Roasted Vegetables:
INGREDIENTS:
§  2 ½ -3 cups cooked* spaghetti squash, from about 1 squash
§  5 bell peppers (preferably yellow, but color would be fine), roasted **
§  2 Tbsp olive oil
§  ½ tsp salt
§  1 lb cherry tomatoes (more or less can be used according to preference), broiled***
§  1 cup minced red onion
§  ½ - ¾ cup all-purpose flour or rice flour
§  1 tsp salt, or more to taste
§  1 tsp freshly ground black pepper
§  2 Tbsp minced, fresh oregano, or 2 tsp dried
§  4 large eggs, beaten
§  Oil or butter for the pan
§  Extra freshly ground black pepper
§  1 bunch of scallions, washed, green and white parts sliced
§  Plain yogurt or sour cream
§  Fresh minced parsley

* To prepare the spaghetti squash:
1.       Preheat the oven to 350 F. Slice a small piece off of the bottom end so that it can stand upright. With a large, sharp knife, slice the squash from the stem-end down.  
2.      Scrape out as much of the seeds and pulp from the squash with a spoon without removing any of the flesh. Save the seeds for toasting or discard.
3.      Lightly rub each half with a little olive oil and place them face down on a rimmed baking sheet. Pour about a cup of water in the pan so that it just comes up the sides of the squash.
4.      Bake the squash for about 30 min, until the skin can be just barely pierced with a fork. Remove from the oven and let the squash cool before handling.
5.      When the squash if completely cool, use a fork and scrape the flesh to remove the spaghetti-like strands. Scrape from top-to-bottom for shorter strands and from side-to-side for longer strands. (For the pancakes, shorter strands are easier to work with.) Set the strands aside until ready to use or refrigerate.
**To prepare the bell peppers:
(If you have a gas stove, turn on a burner to medium heat and place the whole peppers directly on the flame. Roast until blackened all over then continue to step 4)
1.       Preheat the oven to 500 F and set to broil. Wash and dry the peppers and place them on a rimmed baking sheet covered with foil and lightly oiled. 
2.      Place the tray on the top shelf of the oven and broil for about 1 min then check.
3.      The skins of the peppers should char completely and blister. Turn the peppers with tongs as one side blackens so that they roast evenly. The peppers are done when they are almost completely black and blister-covered. If they are taking a long time (more than 5 min) to blacken, turn up the heat. You don’t want to make the peppers very soft.
4.      Remove the peppers from the heat (oven or flame) and immediately wrap them individually in plastic wrap (this makes the skins easier to remove) and set aside until mostly cool and ready to use.
5.      When the peppers have cooled down, remove the plastic wrap and then peel off the charred skins. Remove the stems and seeds and slice the peppers ½ -3/4 inch thick. Place the slices in a bowl and mix with the 2 Tbsp of olive oil and ½ tsp of salt to marinate until serving time.
*** To prepare the broiled tomatoes:
1.       Preheat the oven to 500 F and set to broil (same as the peppers). Wash and dry the tomatoes and then slice them about ¼ inch thick and place the slices on a baking sheet lined with foil and lightly oiled. Just before serving, place the tomatoes on the top shelf of the oven and broil for just a few minutes until heated through and slightly cooked.

PREPARATION:
1.       Prepare the squash as described above. While the squash is cooling, prepare the peppers as described above and get the tomatoes ready.
2.      In a large bowl, mix together the cooked squash and the red onion with a fork, gently separating the strands of squash as you do.
3.      In a separate bowl, combine the dry ingredient and then stir in the eggs to form a batter. Mix the batter into the squash mixture and make it as uniform as possible.
4.      Heat a griddle or skillet to med-high heat and swirl in some butter or olive oil.
5.      Drop a spoonful of batter on the griddle/pan to test out. Brown on one side and then flip and grind some pepper over the other side before cooking it. When the tester is done, adjust the heat as needed and taste the pancake to adjust the seasonings and flour as needed. Continue to cook the rest of the batter by 1/8 cupfuls (for small pancakes) or ¼ cupfuls (for larger pancakes.) The pancakes may spread out some, but you can use a spatula to push any streaks back into a circle. As you are finishing up the batch, place the tomatoes in the oven to cook as described above.
6.      To serve: place 3 or 4 pancakes on a plate and arrange a few tomato slices and some peppers on top. Add a dollop of yogurt or sour cream and garnish with the scallions and parsley.

Makes a light meal for 4. Definitely double if everyone is hungry and you want to have any left!


(Sorry for the lack of pictures! I had my hands full trying to get all the veggies straightened out!)
Uncooked spaghetti squash

I tried my squash strands long-ways as I would
if I were eating it on it's own, but this made it
difficult to incorporate it in the batter so I
suggest going from top-to-bottom and making
shorter strands

You can see the tops of the pancakes are totally
and evenly browned like regular pancakes, while
the bottoms are lighter and flecked with green
from the herbs. I think it makes a nice color contrast

The vegetables combinations that could be
used for this recipe are endless, but I thought
the acidic brown tomatoes and the sweet yellow
peppers was just perfect with the pancakes and
the tangy yogurt on top

If you don't like the skins on your tomatoes,
you can easily remove them by dropping the
tomatoes in boiling water for 5 seconds, then
placing them in ice water and peeling the
skins off, but I thought it was too much
extra work and I didn't mind the skins

This makes for an excellent light dinner or an
unordinary breakfast with some perfectly fresh
fruit and the left-overs make a tasty quick lunch
for the following day...if there ARE any left-overs.

Monday, February 21, 2011

Chocolate-Almond Financiers

I think I'm getting an obsession to gluten-free baking and cooking. It sounds weird, I know, but seriously, I'm always looking up new recipes and information and trying to learn as much as I can about it and I think I buy a new type of flour every time I go to the grocery store (hehe sorry dad...). Oh, and when I'm eating I randomly think about how I COULDN'T eat that food if I had a gluten allergy. I'm a weirdo, I know, but ANYWAYS, the good part about this story is that my dear friend Emily who has celiac disease gets to sample some of my recipes and experiments and I get to feed some of my curiosity. Win-win right? Oh yeah, and all of youuu readers get to hear the stories and see the pictures (the semi-decent ones at least) and you get the low down on some gluten-free recipes. I'd say this is a pretty good deal.
So are you now totally excited for this recipe from Gluten-Free Girl??? Well, to tell you the truth, I wouldn't get TOO excited since I didn't think these chocolate financiers were as amazing as I'd been all hyped up about, BUT they were still very nice, especially if you like brownies. They reminded me a lot of brownies with a crunchy exterior and a crumbly, nutty interior. I love how they were really quick and easy and used up some of my extra egg whites, but I think next time I'll follow some other bloggers' advice to brown the butter for extra flavor and maybe some vanilla extract will be added as well. Any other ideas for how to make these babies "pop" a little more would be much appreciated, but in the meantime, these really are a nice little GF treat that anybody would love to try!

(Oh, and for those of you who are wondering, like I was, a financier is just a mini cake-like thing that has a batter made with nut flour, egg whites, and butter (usually browned). So these don't really have to be any particular shape or design.)


INGREDIENTS:
§  1 stick butter
§  1 cup almond meal/flour
§  ¾ cup powdered sugar
§  4 Tbsp cocoa powder, Dutch-processed if possible
§  1/8 tsp salt
§  1/3 cup egg whites
§  ¼ tsp almond extract
§  ¼ tsp vanilla extract
§  Extra powdered sugar for dusting

PREPARATION:
1.       Cut off 2 Tbsp of butter from the whole stick and place in small microwaveable bowl. Take the remaining 8 Tbsp and place in a saucepan or skillet over medium heat. Cook the butter in the pan until it has melted, stopped foaming, and has browned lightly. While the butter is cooking, melt the other 2 Tbsp in the bowl in the microwave. Set the browned butter aside to cool and use the 2 Tbsp of butter to grease 12 financier molds or a mini muffin tin.
2.       Preheat the oven to 400 F. Combine all of the dry ingredients in a medium mixing bowl (this can be done with a fork or whisk, a stand mixer is not necessary unless you make a large batch).  
3.      Stir in the egg whites and the extracts until smooth and then gradually add the browned butter and stir until uniform.
4.      Spoon a heaping Tbsp of batter into each mold (or fill the muffin tins about 2/3 full) and place the molds on a baking sheet and place in the middle of the oven and bake for 10-15 minutes, until the cakes are puffed and slightly springy to the touch. 12 minutes was perfect for me. The edges might look a bit dark, but that’s okay.
5.      Remove from the oven and cool completely on a wire rack before removing from the molds/tins. Before serving, dust the top lightly with powdered sugar.

Makes about 12 cakes.

I just used a fork to mix this batter up and
 it worked fine, easy clean-up!

I used these fun little molds for my financiers,
but a mini muffin tin willwork fine too, just
adjust the amount of batter you use and
the baking time as needed. Also, if you use
molds with fancy edges, make sure to clean
them out REALLY well so that no gluten is
hiding in the ridges from a previous use

Fill them up pretty full so that they bake
over the edges and form a grip for you to
remove them once they are cooled and
that way you don't have to ruin the edges

Baking them on a sheet pan just makes
everything much easier

The edges are a little dark,
but that's okay, you want them
a little crispy so that there
is contrast between the exterior
and the crumbly, cake-like
interior

The powdered sugar dresses these cakes
up a little bit and makes them more
interesting, but you could also try a
drizzle of ganache or whatever else
you think would be pretty

Add some of these to your GF tea-time snack spread!

Monday, February 14, 2011

Introducing the Daring Future Chef

I gotta say, I've been pretty excited about writing this post. Since I heard about the Daring Kitchen I've been wanting to join in on all the fun and now I've finally done it and this is my first Daring Cooks post! For those of you who are unfamiliar with the Daring Kitchen, it is an internet group of blogging AND non-blogging cooks and bakers who want to push themselves and aren't afraid to try new things. The kitchen is divided into Daring Cooks and Daring Bakers and every month, both groups get a new food assignment to make within the next few weeks and then everyone posts about it on the same day (the bloggers do anyways). There are different rules and regulations that kindof keep it all together, but that is the basic idea. Pretty cool, huh? So anyways, as part of my "New Year's resolution" if you will, I decided to join the Daring Cooks and see how it goes and hopefully if I can keep up with it and it's a lot of fun, I'll join the Daring Bakers next year. But let's not get too far ahead of ourselves, this is only my FIRST post!
So our assignment for February was Japanese Soba Noodles and Tempura Vegetables/Shrimp. I was pretty eager for this challenge since I've never made either at home before, but I have see them done at school and it didn't look TOO terribly hard...at least that's what I was hoping. Before I started looking at recipes and such, I dug a little deeper into how these foods are typically/best prepared. Soba noodles, first off, are dark brown/gray-colored noodles from Japan made with buckwheat and wheat flour. They are usually served chilled with a dipping sauce or warm in a soup. After some more research, I decided to prepare Hiyashi Soba, a cold noodle salad served with various toppings and dipping sauce. Tempura is another very popular Japanese cooking method. It just means that food is dipped in a light batter and fried briefly so that it remains light and crisp. I guess just about anything COULD be made tempura-style, but shrimp and veggies are the norm. Since it IS still February, my vegetable choices for these dishes was somewhat limited, but I tried to pick things that weren't waaay out of season and work with what I did have. I had to look around a bit to get my hands on soba noodles and daikon radish, but I finally found some and was very excited to by trying so many new things at once. But enough blabbing, time to tell about my adventure.... :D
For my hiyashi soba I didn't use a recipe, but just kindof picked up the basic idea from some different resources and decided to put it altogether based on my own taste. Here's what I used:
  • soba noodles
  • mung bean sprouts
  • omelet strips
  • grated daikon radish
  • minced fresh ginger
  • dipping sauce
This dish came together suuuper easy as all I did was cook the noodles, make an omelet and cut it up, prepare the radish, ginger, and dipping sauce and that was all I had to do. I let my family compose their own "salads" however they liked. The only thing I would say to be careful about is the noodles. I followed the directions on the back of the bag and only boiled them for 4 or 5 minutes and they were perfectly done so just don't leave them along to turn into mush and you will be good! For the dipping sauce, I didn't have any mirin (Asian cooking wine) so I couldn't make the standard sauce for the hiyashi or the tempura veggies. Instead, I finally found a sauce recipe in my Professional Cooking book that I had all the ingredients for and sounded like it would work. It was actually a Vietnamese Dipping Sauce, but oh well, it worked! 
(Sorry about the lame pictures, I took a lot more, but it wasn't till I was almost done that I realized my memory card was malfunctioning! :( so here's what I salvaged!)

 
After cooking the noodles I rinsed them, let
them dry, and then chilled them as I prepared
the other ingredients

I used one egg to make a small, thin omelet,
but if you could use 2 eggs for longer or
thicker strips

The Vietnamese dipping sauce was very simple.
Just 1/4 cup soy sauce with some garlic, ginger,
red pepper and lime juice. I think it was better
the next day though after it had more time for
the flavors to meld

To serve, I just plated some chilled noodles
then layered on the mung bean sprouts, omelet
strips, and then on top you can see the grated
daikon radish, which I thought was really good

Here's my finished product. I forgot to get
PICKLED ginger for the top so I just soaked
some fresh ginger in the dipping sauce and
put it on top. Not 100% authentic, but a good
start I think :)


Now for the tempura. I chose not to do shrimp as well because 1) we didn't have any raw shrimp 2) I didn't want to mess around with changing the temp of my oil and all that when this was my first time deep frying. So my vegetables choices were as follows:
  • Sweet potatoes cut brunoise (like matchsticks)
  • Green bell peppers cut bruinoise (thin strips)
  • Carrots cut rondelle (rounds)
  • Sliced mushrooms
  • Sliced onions
I cut everything about as neatly as possible and quite thin so that everything would cook quickly and uniformly, which is very important. After looking at a number of different tempura batter recipes, here is the one I chose:

INGREDIENTS:
- 3/4 cup all-purpose flour
- 1/4 cup corn starch
- 1 1/4 cups ice water
- 1 large egg
- a pinch of salt

I had a little trouble trying to mix the egg into the batter as I was using chopsticks (authentic method) and I was trying very hard not to over-mix the batter, but it seemed to turn out okay. The reason ice water is used is so that the differing temperatures of the cold batter meeting the hot oil will create an extra crispy exterior. I thought help keep the batter nice and cold by keeping it in an ice bath, but unfortunately this didn't seem to help much. I also had trouble keeping my batter a nice consistency so it wouldn't stay on some of the veggies and others got a heavy slathering :/ Overall, I think my main mistake was not having my oil hot enough. I was afraid of having it too hot, but in the end I found myself deep frying the vegetables too much because the batter wasn't cooking fast enough. The end result? The vegetables weren't crispy and they all tasted a lot like fast food French fries, but my family liked them way more than I predicted (probably thanks to the over-deep frying :p) So now I'm not so afraid to try my hand at deep frying, BUT I'll give myself more time in the future and I'm going to try to NOT make such a huge mess of my kitchen!


Stirring an ice water batter with chopsticks
...harder than it sounds...

My trusty dutch oven filled about
2/3 with hot canola oil and equipped
with a thermometer to monitor
the temp

Here's a batch of carrots frying. I tried to gage
doneness by appearance instead of time, but
neither method seemed to work particularly
well for me. Advice anyone??

I tried to set up an orderly station next to my
"deep fryer", but things got crowded pretty fast

Oh, and REALLY messy too between the flour
for dredging, the batter, the oil, yeah...


The finished product didn't look TOO bad to me,
but I def advise only making as much as you want
to eat AT THAT TIME because the next day they
will be a mushy yucky mess!

Tempura Vegetables with Dipping Sauce (I
used the same sauce for the soba noodles and
the tempura vegetables)


 So there we have it: my first ever Daring Cooks challenge, COMPLETED!!! I feel daring already... :) I'm looking forward to next month's assignment and I hope you are too!