Saturday, May 14, 2011

Chicken Fabrication: how to butcher a whole chicken

Buying whole pieces of meat and cutting them up at home is a great skill to have and it can save you a lot of money! Once you know how to make the right cuts and how to use all of the parts, it's really not as daunting a task as you may think. I know several people who buy a few chickens a week and then devote a certain day to fabricating them and making stock and then they are good to go for at least another week. I don't buy that much simply because we don't eat a lot of chicken at my house, but being part of the cooking competition team at school, fabricating chickens is something I have to practice so I'm trying to make the switch from buying chicken parts to buying whole chickens and making my own parts. I think this also helps kids and adults connect with their food more as they see a piece of meat that actually resembles the living animal rather than just biting into a leg and not really thinking "this is a LEG". Also, I think whole chickens are usually a lot fresher than chicken parts and of course making your own stock much healthier as it doesn't have all the salt and preservatives in it and it's naturally gluten-free!
So, even if my pictures aren't perfect and it seems really confusing, I highly encourage everyone to at least try it once! It's okay if it takes you a long time! I need to cut my 15 minutes down to 3 minutes for competition so I can speak from experience when I say it really does get easier every time you do it. Maybe I'll even post a video of me fabricating when I get my time down just to show that it can be done...


First things first, you want to make sure
your boning knife (on left) and your
chef's knife (on right) are both nice and
sharp so that you can cut through the
flesh and bones with ease. If you do not
have a boning knife, you can just use a
chef's knife, but a boning knife is best.

Secondly, as part of mise en place, get out a
pan for the bones, a pan for the chicken pieces,
and a pan for the skin. If you intend to roast
the bones for stock, use a roasting pan.

Open the chickens from their bags in the sink
to drain so you don't get the blood everywhere.
(Make sure to thoroughly clean and sanitize
the sink afterwards as well as the counter tops!)

Assuming that your chicken is already gutted
of its internal organs, the first cut will be to
remove the wishbone, found just below where
the neck would be. Use your fingers to feels the
V shape of the bone and then make slits with
your boning knife around the shape of the bone.

Use your fingers to feel in the slits and grip
around the bone to pull/wiggle it out.

If the wishbone breaks while you try to remove
it, it's okay, just get all the pieces out as best
as you can and put them in the bone pan.

Next will be to remove the wings. At school we
cut our chickens to make "airline breasts", where
the arm bone is left in. If you don't want the bone
in, you can cut it out as you cut the breast off
of the the ribs. To remove the wings, first cut
on the fat line around the shoulder, as seen above.

 Here you are cutting through just the skin
and the meat, not the bone, all the way around.

Next you want to remove the wing in one
movement by bending the elbow backwards
and breaking the joint and then twisting to
remove the wing and the forearm bone, but
not the upper-arm bone. Do this with both
wings.

Here I have the removed wing in my hand and
the chicken with the arm bone still attached
for the airline breast. Place the wings in the
chicken piece pan.

Next, to remove the legs, you want to follow
the fat line again, between the hip and the leg.
You want to carefully just through the skin,
not the meat, so that the flesh is revealed.

Cut the skin far enough up and down so that
you can easily see the legs.

Flip the chicken over and grasp both legs.

Pull the legs backwards and bring
them together until they break.

Now, to remove the legs, use your fingers to
find the sockets of the hip and push into the
crevices to remove the little pockets of meat
there called the "oysters". This step is not
essential, but it's required at school and it is
how good to know how to get all the meat off.

Keep in mind, there are two sockets in the hip,
thus there are two oysters to remove. You
will know whether or not you have gotten the
oysters if you find little pockets of meat still
connected to the hip when you remove the
legs.

Once the oysters are removed, carefully cut
around the hip and then cut in between the leg
bone and hip joint to remove the thigh.

One thigh removed. Repeat with the other side.

Both legs removed.

To separate the lower portion of
the leg from the thigh, follow the
fat line (shown by my finger) on
the inside of the leg.
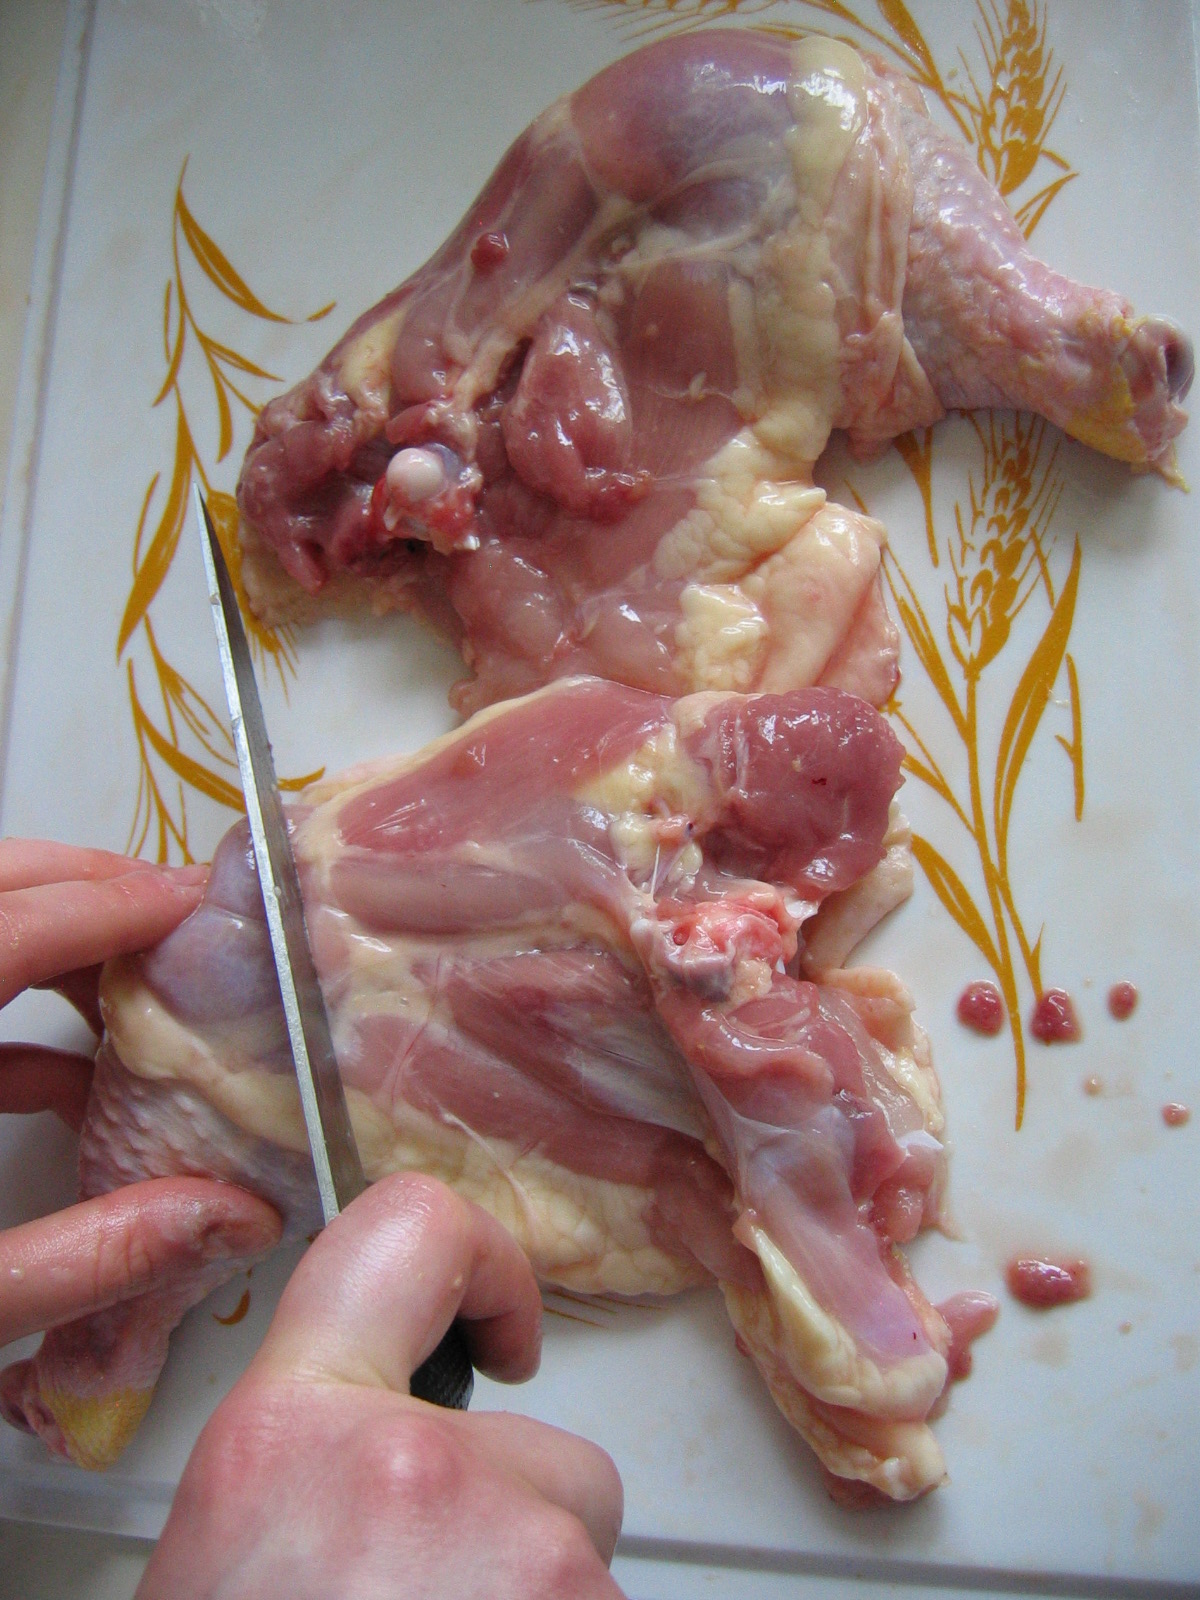
Use your finger to feel where the
joint is in the leg near that fat line
and then use your knife to make one
swift cut in between that joint.

If you feel bone, you are in the wrong
 place and just try moving over until
 you find the opening. You'll know it's
 right because it should cut very
smoothly and easily.

You now have your leg and thigh.
Repeat on the other side and place
all of the legs and thighs in the chicken
piece pan.

The next step is not as neat and
smooth as following fat lines. To
cut out the spine you need to make
a guideline slit on each side of the
spine and then use your chef's knife
to cut through the ribs all the way
down.

FYI: cutting through the spine  might take a
bit of work, but just keep pressing hard with
your chef's knife until you get through. As long
as you aren't cutting through to any of the meat,
you are fine.

Remove the spine, cut it into 3-4 in
pieces and place them in the bone
pan.
Once the spine has been removed, you will
see someting that looks like a spearhead
between the two breasts. This is the keel bone.
Make a slit down either side of the keel bone,
just cutting through the top of the flesh.
Use your fingers and go into the slits to separate
the keel bone from the flesh, then remove the
bone.
It's ok if the keel bone breaks as
you are removing it, just make sure
to get all the pieces out and place
them in the bone pan.
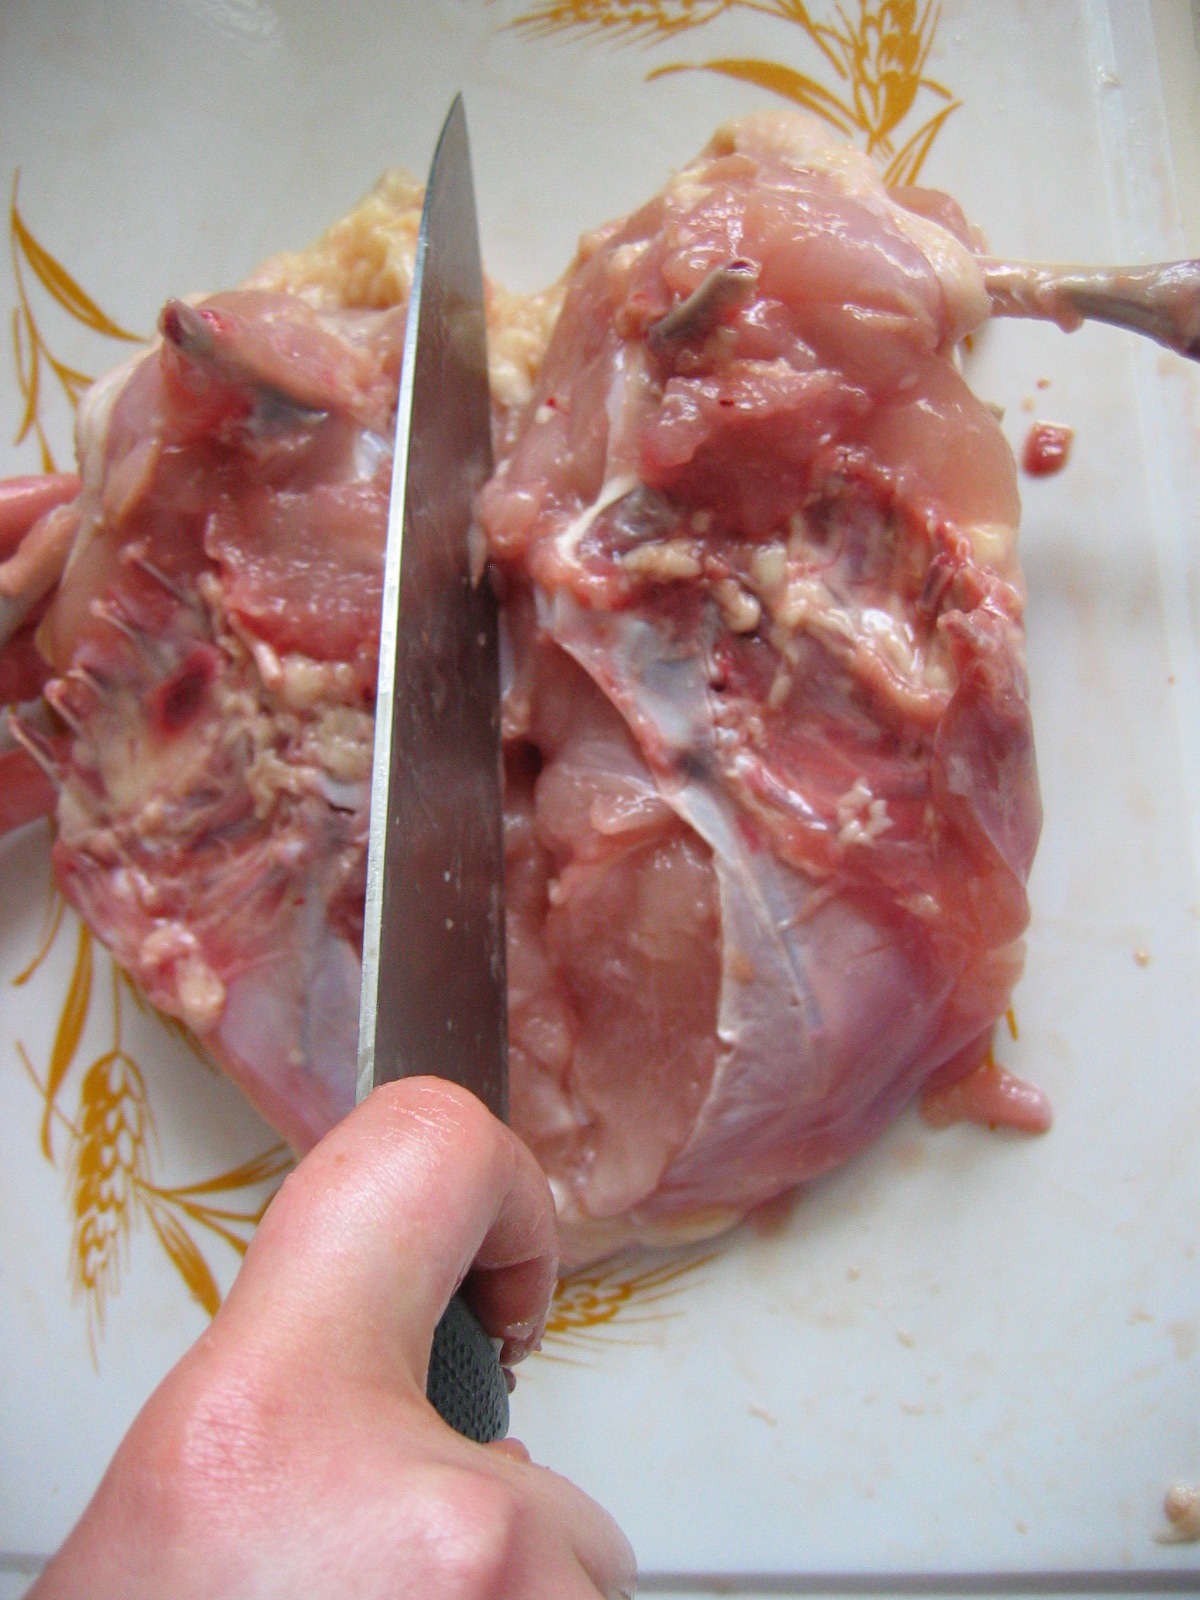
To separate the breasts, just cut
smoothly between them.

Both breasts, ready to debone.

Next, to remove the breasts, carefully use your
boning knife to cut off the ribs without taking
too much of the meat with them.

If you want your breast to be
airlined, be careful not to cut off
the arm bone as you are removing
the ribs. If you do not want the arm
bone in, simply cut it off with the ribs.

Ribs removed from the breast, airline bone left in.

For skinless breasts, simply slip your hand under
the skin and carefully pull it off of the flesh.
If the skin holds on tight, do not rip the skin, use
your knife to cut the skin off where it is connected.
Place the skin in the skin pan to be rendered for fat.

Once the skin is removed, trim off any visible
fat and add to the skin pan. Repeat with the
other breast. (sorry about the creepy-looking
hand..double-jointedness strikes again)

From here you are done fabricating and you can
proceed to use the chicken meat as you wish and
you can render the fat and use the bones to make
stock if desired.

Thursday, April 28, 2011

And the Winner is...

First of all, Happy Easter to everyone! I hope you all had a great weekend celebrating Christ's work on the cross! How did you spend your Easter? Any cool stories or traditions? Tell me! I'd love to hear 'em!
Secondly...this post has been overdue for a while, but I think it'll be worth the wait! So without further ado, he's the brief story of my winning recipe:

About a month ago my dad sent me an email about a culinary contest that he saw a flyer for at his work. The competition was for a "colorful, kid-friendly entree" that met certain nutritional requirements. It didn't seem too hard to me, especially seeing that I am already a big fan of colorful and healthy foods. However, I soon found out it wasn't as simple as it sounded.

For one thing, I had less than a week to type-up and submit my recipe, which would be examined for nutritional information and to see if I would be selected to go in and make the recipe for a panel of judges and compete for the prize. I don't know you, but I like a little more time for planning and practicing, but since I didn't have that I just had to make do. Over the next few days I tried to come up with a "kid-friendly entree" that would be intriguing and just loaded with veggie and/or fruity goodness. I've done the black bean brownies and tofu chocolate mousse so I figured I could pull another one of those out of my sleeve.

After a few days to scan magazines and cookbooks and with the clock ticking down I finally decided to make my newly created Spaghetti Squash Pancakes with Roasted Vegetables. It was fairly quick and simply and full of different vegetables and kids love pancakes, right? What's not to love? So with my new plan in mind, I went out and got all my ingredients and allotted Sunday afternoon as my time to practice, experiment, and work out any kinks as well as develop any cool new additions to my recipe.

Sunday afternoon came and went with lots of sweat, frustration, and dirty dishes. Squash and sauce was everywhere and my balsamic reduction experiment was not only ruined, but it burned a hole through its plastic container and left black goo all over the microwave. Awesome. Completely exasperated and a mess, I recruited my sister to help me clean up the kitchen before we went to youth group. I got back home around 8 and immediately started a new plan in my last desperate hope. I decided to just go simple and safe and try spaghetti squash noodles with tomato sauce and meatballs. The tomato sauce recipe I adapted from Cooking Illustrated's recipe, the chicken meatballs recipe I adapted from an online recipe I found, and the spaghetti squash noodles are just my version of the typical preparation.

So, making meatballs, tomato sauce, and spaghetti squash in record time I came up with my final attempt at a recipe to submit. To my great relief and surprise the tasting samples got great reviews from my family who so graciously tried them out at 11 o'clock at night. With my energy reserves reaching an end I carefully typed up my recipes to be ready to submit in the morning. My dad helped me proofread it all and tidy up any loose ends and then he said it needed a kid-friendly name so we decided to call it "Skylar's Squashetti and Meatballs". Slightly cheesy perhaps, but at this point I was just ready to have fun with this thing and I was glad to have my recipe finally chosen! Fast forwarding now, my recipe DID get accepted for the competition and I had one week before the day I would prepare it before the judges! In that short of time I unfortunately had NO time for practicing and therefore pretty much just had to wing it on competition day.

At the competition I shared a large kitchen with the 3 other competitors. We each were given a big table to work at with all of our provided ingredients and helpers stood by to get us anything we needed or couldn't find. It was pretty cool! I had 2 hours to prepare and plate 8 servings of my dish. Sounds like a lot of time, right? Yeah, well it makes a big difference when you are in a foreign kitchen without all your favorite tools and equipment that acts and operates much different from the stuff back home! Trust me, it messes you up! Still, I had any help I needed (besides actually preparing the food) and I wasn't rushing around like crazy person, I worked quickly and carefully and for only making the dish for the second time ever, I dare to say it turned out pretty darn well. Not the most attractive dish in my opinion, but what it lacks in looks it makes up in flavor! Still, I had some pretty stiff competition from the three other ladies working in the kitchen with me. Cornmeal-crusted chicken nuggets with colorful pico de gallo next to me and homemade pasta with veggies and roasted garlic from another competitor and mini pizzas and fruit kabobs at the other end of the kitchen.

The dishes would be examined and tasted by 6 judges including an executive chef, a health professional, a weather man from a local news station, and a young girl (because the competition was for a KID-friendly entree afterall). The judges were all pretty friendly and they asked good questions so I really wasn't very nervous as I would have expected, but that's good! :) Anywho, after cleaning up and hanging out for a while, the judges finally made their choice! The winner? (drum roll please.......) ME!! You can imagine the shock I must have been feeling for my almost-complete-failure "squashetti" to actually WIN the competition!


My winning plate at the competition :)
 
Soooo on top of getting this awesome gift basket full of goodies pictured below, I got my picture and recipe in the base newspaper and the base medical center restaurant will feature my recipe on its menu for a month! If that weren't enough, I also was asked to do a short segment on the local morning news where I would prepare an abbreviated version of my recipe! How cool is THAT?! I was pretty psyched! What a way to end my crazy first cooking competition!

My lovely gift basket filled with a cutting board, 2 sandoku knives, 3 cookbooks, a spatula, a recipe booklet from the competition, and a bunch of healthy eating pamphlets, pencils, pens, etc. Fun stuff!


I won't bore you with ALL the details of the news segment, but basically I had three minutes to demonstrate a few of the important elements of making my dish and then I quickly plated a portion for final presentation. As if making a whole entree in three minutes wasn't hard enough, I also had to answer questions and not look like a total weirdo in front of a live camera. Working quickly, speaking eloquently, and not looking like a weirdo are definitely not my fortes at all, but it went pretty smoothly and I didn't cut any fingers off in front of the whole world so I say it was a success! Not Food Network quality, but not too shabby either. You can see the video clip here. (no laughing though, I'm horrible in front of cameras!)

Alright! Now that you know the gist of that whole long story I bet you are just DYING to actually create this winning dish and see for yourself just how yummy it is, right? Right! So, me being as nice as I am, I'm sharing it with you as always so please do try it out, it's pretty simple and not too time-consuming and you just feel super good about eating it! Thanks for reading!

Skylar's Award-Winning "Squashetti and Meatballs"


Chicken Meatballs
Ingredients:
§  1 1/3 lbs chicken, ground 
§  1 cup breadcrumbs (I use 2 slices of whole-wheat bread, toasted and ground)
§  2 minced garlic cloves
§  1 tsp garlic powder 
§  2 tsp dried basil
§  1 egg well beaten
§  1 teaspoon salt
§  1 teaspoon freshly ground pepper

Preparation:
1.        Preheat the oven to 375 degrees. Line a sheet pan with parchment paper.
2.      In a large bowl combine ground chicken, bread crumbs, garlic, garlic powder, basil, , egg, salt, and pepper.
3.      Combine gently. (You can use a fork or spoon if you want, but I think clean hands are the most fun and the most efficient!) 
4.   Gently form the mixture into 1-2 in balls with your hands (or an ice cream scoop) and then place on the prepared sheet.      
6.      Bake for 20-25 minutes, until cooked through and lightly browned. (You can take one out at 15 or 20 min and cut it open to see how much longer you need.)
7.      Remove from the oven and freeze for later or add them to whatever sauce they will be served in and allow them to simmer in the sauce for at least 10 minutes to absorb some of the flavors.


Bread crumbs are easy to buy in a box at the
store, but with just a little extra effort you
can have waaay better bread crumbs with
nothing more than a few slices of good bread
(I like whole wheat!) and a food processor,
blender, or coffee grinder even!

If you have a meat grinder, definitely feel free
to put it to good work here. I, sadly, do not
have one so I put my trusted food processor
to the job and with a few pulses it did just fine.
You can also buy pre-ground chicken meat to
make this even faster and easier, but I think
grinding up the whole meat ensures fresher
meat. That's just me though.
Never made your own meatballs before? I
hadn't either before this competition so if I
can make winning meatballs on the first try
with no professional meatball-making training,
SO CAN YOU!
Yep, dig into that sucker with you hands! It's
definitely the way to go!
I like mine a bit smaller than a golfball, but if
you chose to make yours bigger or smaller
just make sure you adjust the cook time as well.


Baked meatballs = easier than pan-fried and
without any added fat.


Ready to be baked!


These guys freeze really well and can then be
ready to go all the time when you are just
DYING to make Squashetti with Chicken
Meatballs and Tomato Sauce!

Tomato Sauce
Ingredients:
§  Olive oil (about 1-2 tbsps)
§  1 large onion, minced (about 1 cup)
§  4 med-large cloves garlic, minced
§  2 large cans (about 28 oz) stewed tomatoes (do not drain)
§  1-2 Tbsp chopped kalamata olives, roughly chopped
§  1 Tbsp capers (chop these if you don't like the little chunks)
§  6 Tbsp chopped fresh basil
§   1 Tbsp chopped fresh rosemary
§  ½-1 tsp sugar (optional)
§  Salt and freshly ground black pepper, to taste

Preparation:
1.       Add a few Tbsps of oil to a large saucepan (to coat the bottom) and bring to med-high heat. Add the onion and the garlic and sauté for a few minutes until soft and lightly browned.
2.      Add the tomatoes, olives, capers, and the herbs and stir to combine. Bring to a boil and then turn down the heat to low and let the sauce simmer for at least 30 min, until cooked down and thick, continue cooking if want it reduced further or thin with more tomato juice or stock if desired.
3.      Taste the sauce and add the sugar if needed then season with salt and pepper. Puree the sauce if desired or leave it chunky.
4.      Keep warm until ready to serve. Serve with any of your favorite pasta dishes. Makes about 3-3 1/2 cups. Serves 6-8. 


Enough oil to keep the onions from sticking.
Sauteing onions.
Unless you can get REALLY good, in season
fresh tomatoes that you want to use in this,
canned is the way to go! It's also much more
convenient.
However, whether they're in season or not, you
HAVE to use fresh herbs in this sauce! That's 
what sets it apart from the "meh" sauces and
puts it up there with the "Wo-hoah!" sauces! 
If you have the time to spare, let this sauce
simmer for at least 30 minutes to a couple
of hours to just cook down and really mature
the flavors, otherwise just cook it until it
is reduced to your liking.
Don't feel like making your own sauce ALL the
time, but you just can't get enough of this stuff?
Make a whole big batch at once and then freeze it
in batches. It works!

§  2 med-large spaghetti squashes
§  1-2 Tbsp olive oil
§  Salt, to taste
§  Freshly ground black pepper, to taste
§  1-2 Tbsp chopped, fresh oregano
§  4 cups chopped spinach
§  Spaghetti sauce
§  2 cups Shredded mozzarella cheese

Preparation:
1.        Preheat the oven to 350 F, cut the squashes in half, scoop out the seeds and pulp and discard or save for later use.
2.      Place the squashes flesh-side down on 1 or 2 rimmed baking sheets and pour in enough water to come about ½ inch up the sides. Place the trays in the middle of the preheated oven and bake for about 35-40 min, until the skin can be pierced pretty easily with a fork.
3.      Remove the squashes from the oven and cool until easy to handle. Use a fork to gently comb the flesh of the squash from side-to-side so that the strands look like long spaghetti noodles.
4.      A little bit before serving, heat the oil in a large skillet med-high. When heated, add the squash noodles and season with the salt, pepper, and oregano and toss with tongs. Add the spinach and toss to combine. Remove from heat and plate. Serve with sauce and shredded mozzarella cheese.


An ordinary-looking squash, secretly filled with
noodle-like goodness!
Cut off both ends first to make it easier on
yourself when you go down the middle.
When you get all the gunk out of the cavity,
you can save all the seeds to use later! Use
them like pepitas or other squash seeds.
Adding the little bit of water to the pan actually
steams the squash in the oven and keeps them
from sticking to the pan so don't worry about
oiling it or anything.
I don't recommend freezing these noodles
because when they defrost, all the moisture
gets pulled out and it's not too good. However,
if for some reason you just HAVE to freeze some,
wring out the defrosted squash in a clean kitchen
towel and use as normal.


Spinach in pasta = amazing. DO IT.

Now that's some amazing squash right there!
Could this GET any better?
Astonishingly, yes :) A little fresh mozzarella
and this dish is MADE! You're looking at a
winner!

PS: If you would LIKE any more information about the contest, TV segment, etc. I'd be happy to answer any questions.